
Here's a little history on Yo-Yo's
(skip ahead to the tutorial if you are about to yawn)
"The Yo-Yo quilt was a popular style of quilt making in America from the 1920-40s. Yo-Yos, or tiny circles of fabric, were gathered up at the edges and sewn together to create a three-dimensional effect. Yo-Yo quilts were popular because women could carry the little circles of fabric with them and make Yo-Yos whenever they had a free moment. Another way to explain the popularity of the Yo-Yo quilt may be its association with the toy called the Yo-Yo, very popular in the 1930-40s."
found here
Here's what you'll need:
-Iron
-Scissors
-Needle & Quilting Thread
-Marker
-Circle Template
-Fabric Scrap

Note:
*You can use any circle shaped object you have in the house (a mug, bowl, coaster, etc).
*Your finished yo-yo will be about 1/2 the size of your starting circle. To make a 2 inch finished yo-yo, begin with a 4 inch circle template.

Step 1: Trace and cut out your circle.

Step 2: Turn fabric right side down and press the edges with an iron - about 1/8 inch all around. This doesn't have to be exact, but you'll want to keep the circle shape.
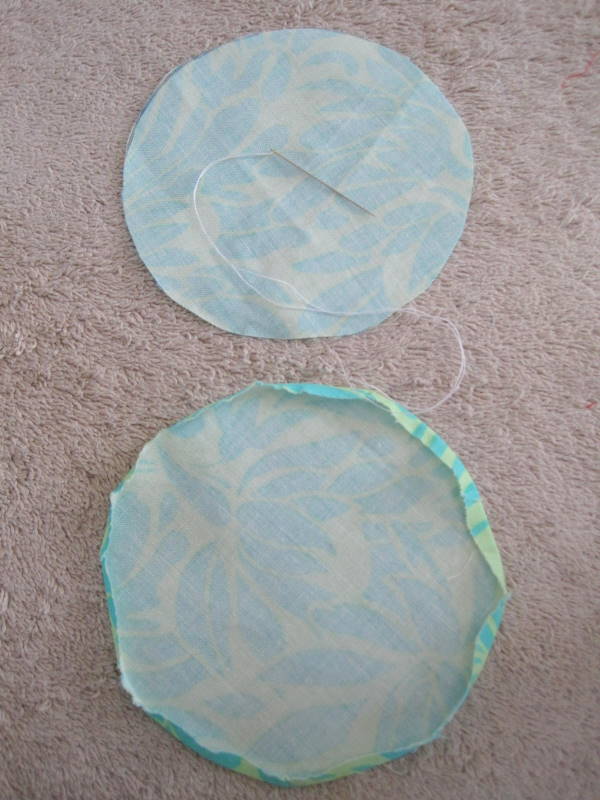
Step 3: Thread your needle and knot the end. Start at the edge facing you and go in and out making a running stitch around the perimeter of the circle.


You can pull your thread and fabric as you go to see how it looks.


Step 4: When you get to the beginning again, finish with your thread going inside the yo-yo, knot it off and clip the string so that it's hiding inside.

Step 5: Straighten the gathers and flatten with an iron.

Simply stitch these little guys to tee shirts to create little yo-yo clusters:


Or glue them to some hair clips:

Or make them into a necklace:

The possibilities are endless! Happy stitching!


SO SO CUTE! I am going to make some.
ReplyDeleteI LOVE these! My SIL and I just made a bunch last weekend and I've already started a few projects with them!
ReplyDeleteThis is super cute! Love the tee it's adorable! Would love to have you stop by the Sunday Showcase Party if you get a chance! Your tutorial is fabulous! Hope you had a wonderful weekend! Stephanie Lynn
ReplyDeleteThose are so So cute!! I'd love for you to link this up http://iheartnaptime.blogspot.com/2010/05/sundae-scoop-favs-link-party-and.html
ReplyDeleteDarling + thanks for the tutorial. Visiting from Skip to My Lou (-:
ReplyDeleteThanks for the tutorial, Allie! I've been recently wanting to start yo-yo making! :)
ReplyDeleteThanks again for such a fabulous tutorial. I just love what you have made with these! Thanks so much for stopping by and joining the Sunday Showcase Party. I greatly appreciate it! Hope you have a great week! ~ Stephanie Lynn
ReplyDeleteGreat tutorial! These are SO cute. I love all of your examples! :) Found you on Tip Junkie.
ReplyDeleteBrooke @ Craftingchicks.blogspot.com
Thanks, this looks easy enough for a clueless beginner like me
ReplyDeleteI love these!!! Great ideas & job!!!
ReplyDeleteHi..I’m Barb….I am from tip junkie..
I am your newest follower. I hope you will get a chance to visit my blog @ santasgiftshoppe.blogspot.com
& get inspired by something for your family/home. I hope you will follow me as well. Nice to meet ya new friend!!!
lovely, gives me an idea. Thanks
ReplyDeleteI love those t-shirts! So cute! I'll have to try that. Popping by to give you the sunshine blog award. If you are interested, pop over and pick it up.
ReplyDeletewww.lissyinitaly.blogspot.com
Melissa
Hello there. I came upon your website from a link on Simple Organic. I love these yo-yos! They are adorable. I just have a question about what's the best way to sew them on to the garment after you have made them. I am still a beginner sewer and I think I sew better with machine than by hand but any tips you have would be greatly appreciated. Thanks so much.
ReplyDeleteLOVE this thanks so much I'm pregnant and can't wait to try these!!!!
ReplyDelete